
Design Inline Exhibition Stalls Instantly with Boothlane by EaseMyExpo
An inline exhibition stall usually has one open side, so the frontage has to handle visibility, branding and visitor entry at the same time.
The main challenge is not fitting furniture into the space. It is keeping the booth easy to enter, easy to understand and comfortable once visitors and staff are inside.
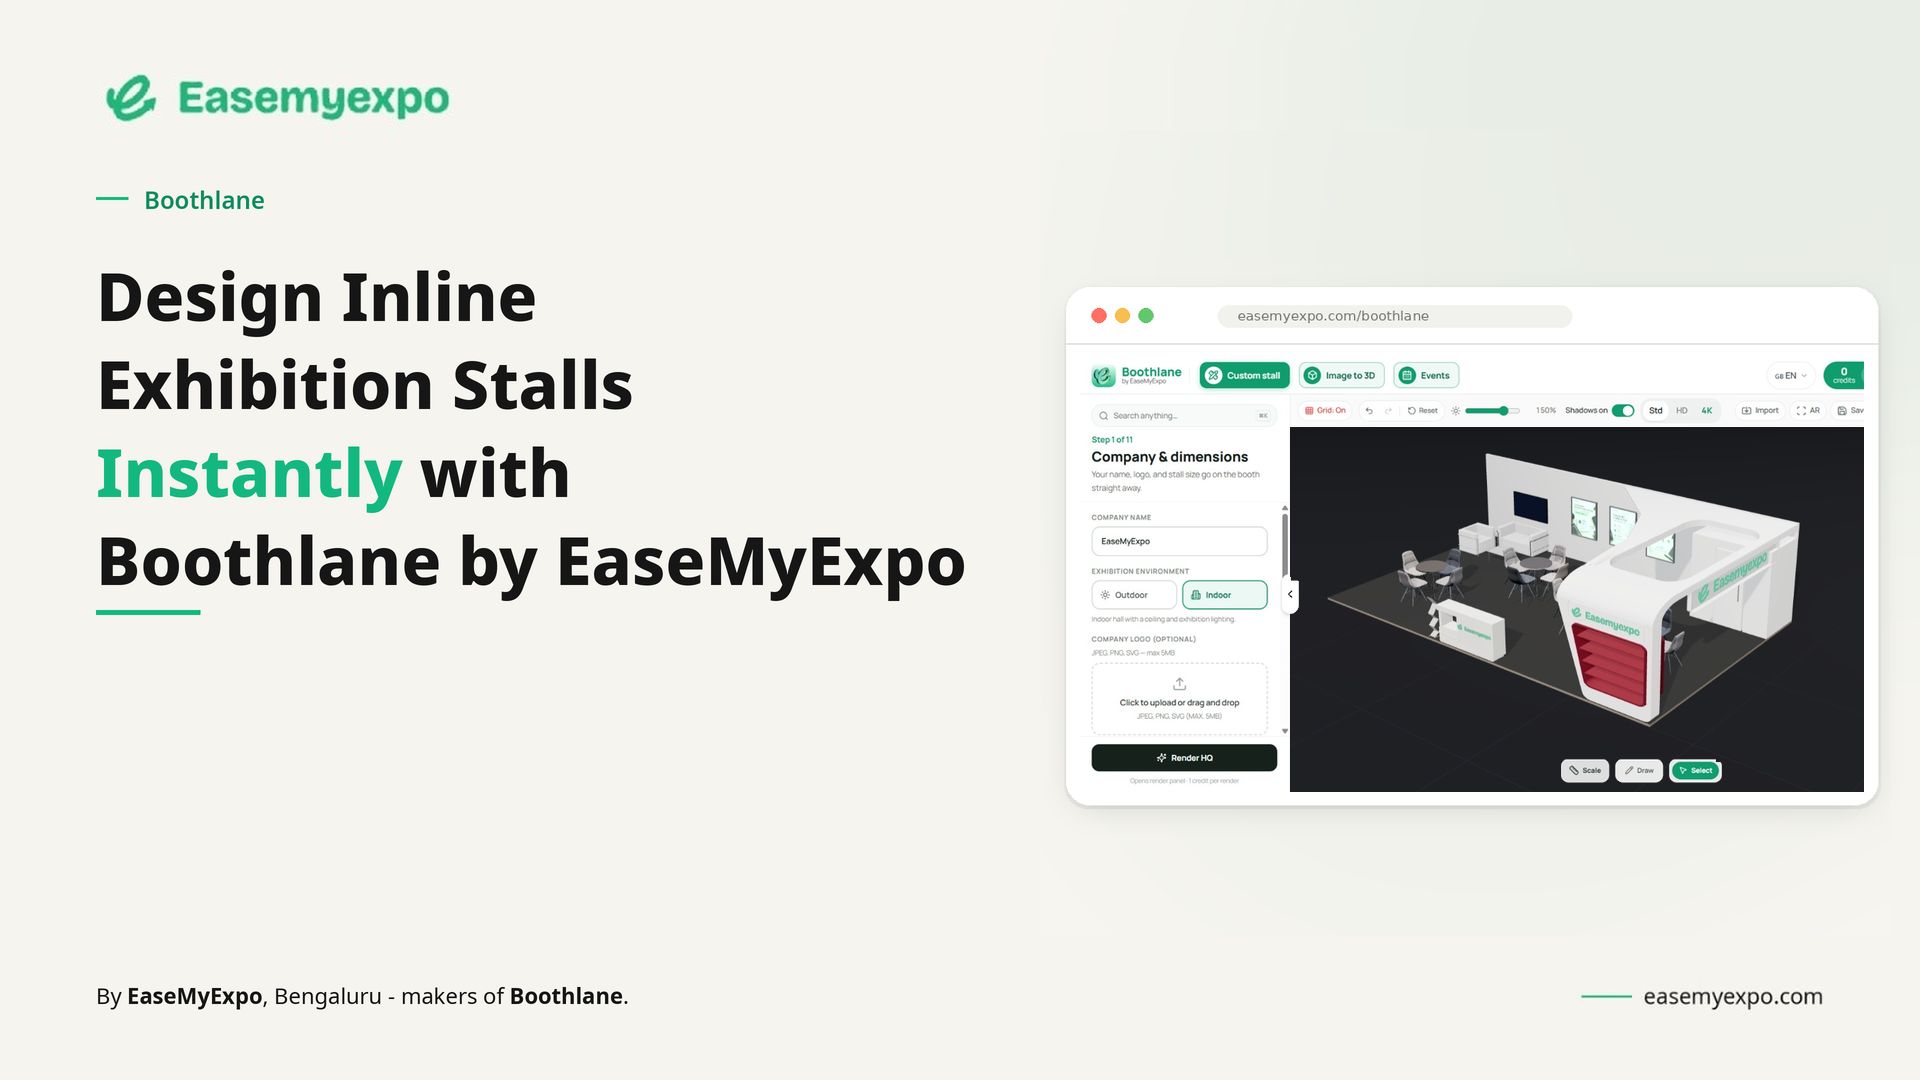
Boothlane by EaseMyExpo lets teams create, edit and review inline stall concepts in the browser before taking the design forward for fabrication.
Quick Answer
How can you design an inline exhibition stall quickly?
Start with the confirmed booth size and one-side-open layout. Keep the entrance clear, place the main branding and product display where they are visible from the aisle, and add only essential furniture. Review the arrangement in 3D before approval.
What Is an Inline Exhibition Stall?
An inline exhibition stall is a booth with one primary open aisle side, usually bordered by neighbouring stalls on the left, right and rear.
Because visitors mainly enter from the front, the design should prioritise frontage, branding visibility and efficient use of internal space.
Exact wall, height and structural rules depend on the exhibition organiser.
Why Are Inline Exhibition Stalls Harder to Design Than They Look?
Inline stalls have limited frontage, so small layout mistakes can affect visibility and visitor flow.
Counters, chairs, displays and storage can quickly make the space feel crowded. The layout should keep the entrance open, maintain clear sightlines and leave enough room for staff and visitors to move comfortably.
The main design tensions are practical:
- Product visibility versus storage: Deep cabinets hold more stock but reduce usable floor space.
- Reception versus access: A wide front counter gives staff a work surface but can make entry awkward.
- Meetings versus demonstrations: Both need standing or seating space; a small booth may not support both comfortably.
- Branding versus clutter: Several competing messages can make the main offer difficult to understand.
- Lighting versus glare: A bright fitting may highlight a product while reflecting badly on a nearby screen.
Good inline exhibition stall design starts by choosing the most important visitor activity. Give that activity space before adding anything else.
How to Design an Inline Exhibition Stall in Minutes
1. Start With the Stall Size
Enter the booked width and depth. Common planning examples include 3m × 3m and 6m × 3m, but use the dimensions on your allocation.
Confirm which side faces the aisle. A 6m-wide frontage offers different possibilities from a 3m-wide entrance into a deeper stall.
Account for construction depth, too. A nominal 3m × 3m footprint does not leave nine square metres of clear floor after walls and cabinets are installed.
2. Select an Inline / One-Side-Open Layout
Choose the appropriate one-side-open configuration or ready layout in Boothlane. Its configurations and fascia options cover one, two, three and four open sides.
Use the starting layout to organise the booth around your objective. For a product demonstration, prioritise a visible display and standing space. For buyer meetings, make seating accessible without turning the entrance into a corridor.
3. Add Your Branding
Build a simple visual order: company name, what you offer, then supporting product information.
Place logos and graphics on branded panels, fascia and signage where approaching visitors can see them. The fascia—the overhead branding band—should identify the stall without visually closing the entrance.
Use a screen when movement helps explain the product. Keep the essential message on a static surface so the booth still communicates between videos.
4. Add Furniture and Product Displays
Start with the fewest objects needed to serve visitors: perhaps a compact counter, one display unit and two chairs.
Check real dimensions. A shallow shelf of samples and a working machine need very different arrangements.
For example, a 600mm-deep cabinet against the back of a 3m-deep booth leaves 2.4m before allowing for other construction or furniture. Small depth decisions quickly affect the remaining space.
5. Check Visitor Movement
Position the counter so visitors can enter without squeezing past staff. A side-positioned counter often leaves a more useful opening than one centred across the front.
Now imagine the stall occupied. Can someone examine a product while another visitor leaves? Can a chair pull out without blocking the route?
Use the 3D view to inspect these relationships, then check actual clearances and accessibility requirements separately.
6. Review the Stall in 3D
A 3D stall design represents the booth visually before construction. It helps you assess proportions and sightlines that are less obvious in a flat plan.
Review the front, both approaching aisle angles and approximate visitor eye level. Look for hidden logos, oversized furniture and a fascia that feels too deep.
Also check the screen position: people should be able to watch without standing across the entrance.
7. Create Renders or Presentation Views
Create views that answer specific questions. Use a front view for branding and an angled view for access, depth and furniture placement.
Check that presentation outputs match the intended layout, especially logos, product quantities and display positions. Attractive lighting should not distract from an impractical arrangement.
Give reviewers a focused question: “Can our team demonstrate the product here while another visitor enters?”
Try your booked dimensions in Boothlane and build the essential layout first. Seeing the entrance, main display and seating together makes the next design decision easier.
Create Your Exhibition Stall in 3D with Boothlane
How Boothlane Helps With Inline Exhibition Stall Design
EaseMyExpo is an exhibition technology company. Its browser-based tool, Boothlane by EaseMyExpo, helps exhibition teams create and review editable 3D stall concepts without installing heavy desktop software.
For inline exhibition stall design, its capabilities support distinct parts of the workflow:OBJ/FBX import and export can support relevant workflows involving other 3D tools. Check transferred assets for scale, materials and compatibility.
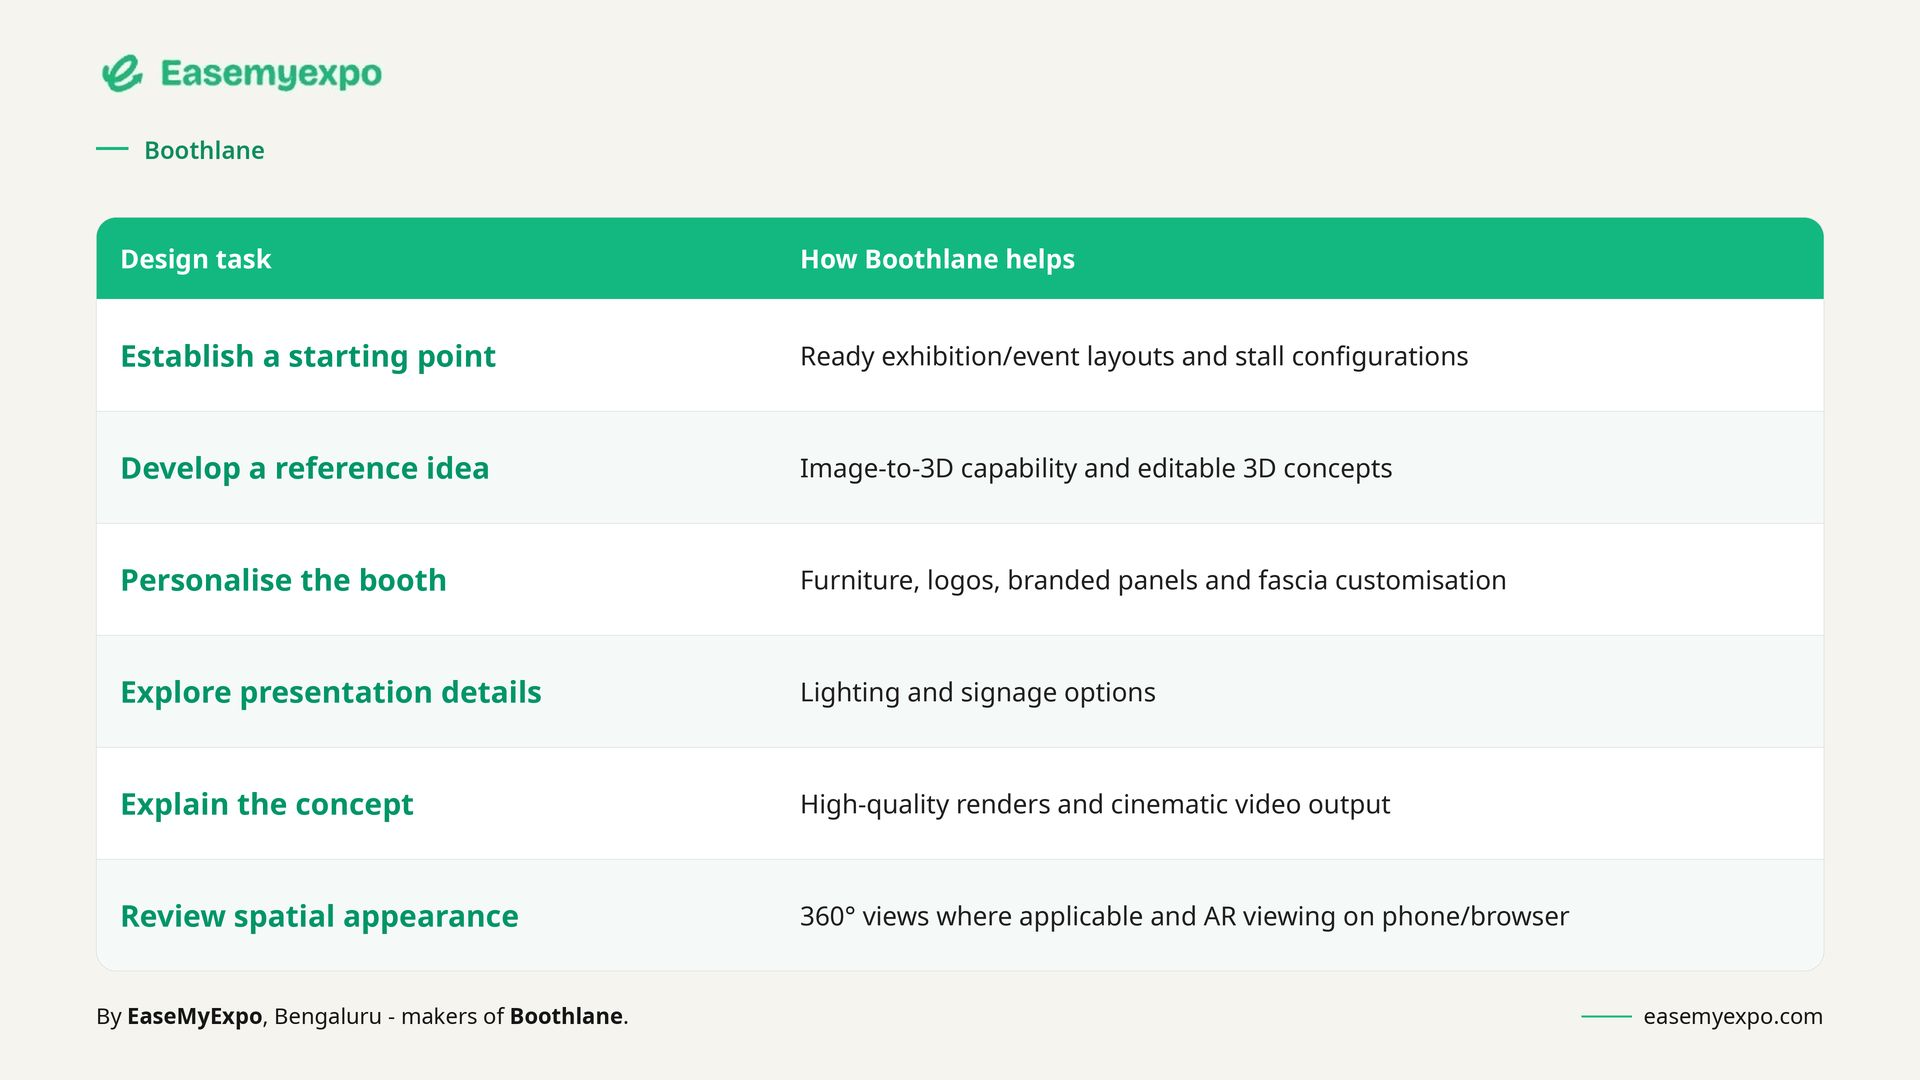
The value is in making decisions visible. A brand manager can assess the message, a designer can refine the layout and a fabricator can discuss how the proposed concept might be built.
Create and review the booth concept before taking it forward with your fabricator. Concept visuals support that conversation; construction details and technical approvals remain separate work.
Example Workflow: From Reference Image to Inline 3D Stall
An exhibitor, a company participating in a trade show, has booked a 3m × 3m inline booth. The brief includes three small products, a reception point, brochure storage and seating for short discussions.
Here is a concrete workflow:
- Choose a reference image or idea. Select an image for its colours, materials or display treatment. Identify what you like rather than assuming its complete layout will fit.
- Set the dimensions and configuration. Use a 3m frontage, 3m depth and one open side. Check the organiser’s permitted height separately.
- Create and edit the 3D concept. Start with image-to-3D or a suitable ready layout. Review the footprint and remove elements that obstruct the front.
- Add branding. Place the logo on the rear panel and fascia. Use one short product message rather than filling every available surface.
- Arrange products and furniture. Try a compact front-left counter, a shallow rear display and two chairs along one side. Reserve enclosed counter space for brochures.
- Review an occupied scenario. Imagine two staff members and two visitors inside. If the chairs block product access, test a standing-discussion arrangement instead.
- Create presentation views. Prepare a front render and an angled view. Ask the marketing team to review messaging and the sales team to review usability.
- Take the agreed concept forward. Give the fabricator the visuals, booking dimensions, product measurements and exhibition manual for feasibility and costing discussions.
This is an example arrangement, not a universal template. The right solution changes with product size, staffing and meeting needs.
Inline Stall Design Checklist
Use this checklist before signing off the concept:
- Dimensions: Confirm frontage, depth, orientation and usable internal space.
- Fascia: Check its position, depth, branding and permitted height.
- Logo visibility: Review it from the front and both aisle approaches.
- Counter position: Keep entry clear when staff stand behind it.
- Product visibility: Make the main exhibit easy to see and approach.
- Lighting: Highlight displays and check reflections on screens.
- Meeting area: Allow for occupied chairs and movement behind them.
- Storage: Keep supplies concealed and cupboard doors accessible.
- Visitor flow: Keep conversations and demonstrations inside the footprint.
- Render review: Verify graphics, proportions and object placement.
- Final approval: Record the agreed version and outstanding technical or organiser approvals.
Check the actual event manual before fixing heights and wall treatments. For example, NAMM’s official display guidance includes restrictions protecting neighbouring exhibitors’ sightlines. These are show-specific requirements, not universal dimensions for every inline booth.
NAMM Booth Display Types and Regulations
Inline Stall vs Corner Stall vs Peninsula Stall vs Island Stall
The main distinction is the number of sides exposed to an aisle. These standard configurations appear in official exhibition display guidance; the typical uses and priorities below are practical planning suggestions.
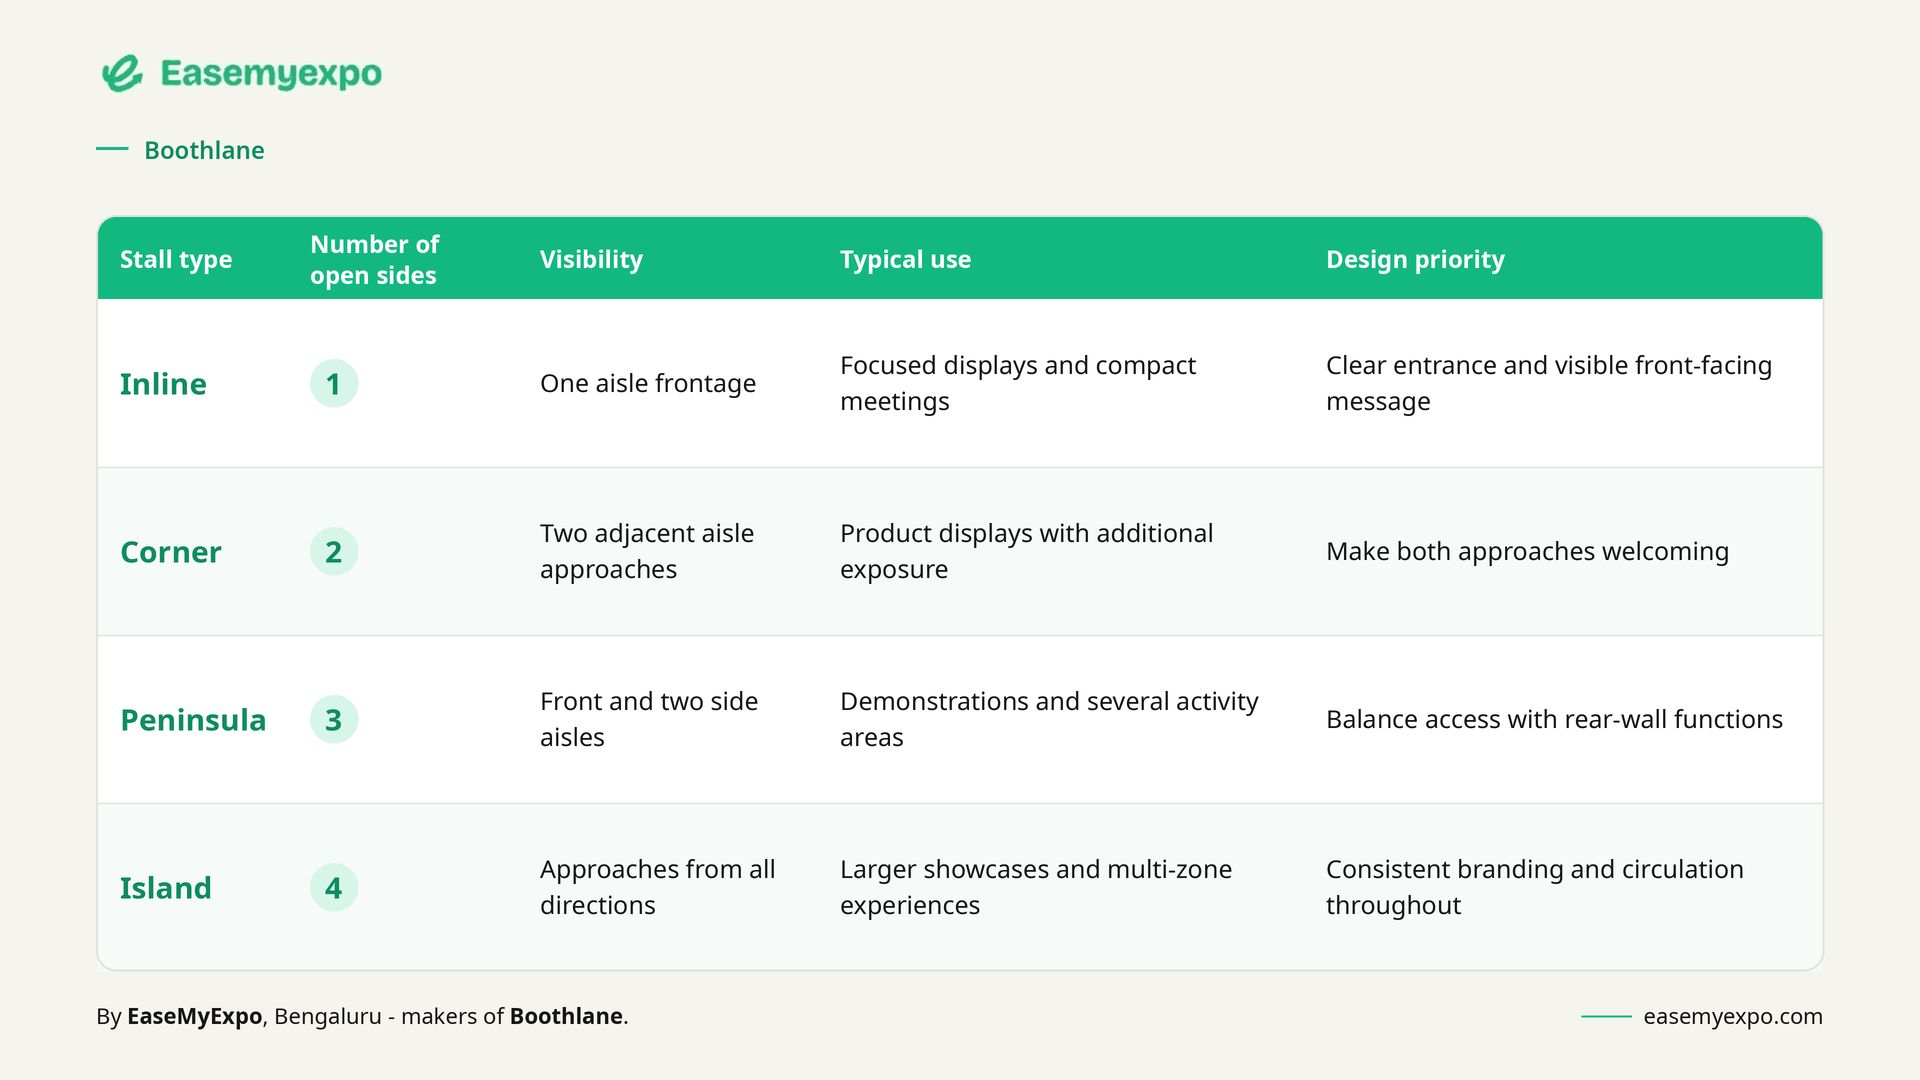
More open sides provide additional approaches but fewer boundaries for graphics and storage. An effective inline exhibition booth makes deliberate use of its available frontage rather than trying to imitate a larger island layout.
Who Can Use Boothlane for Inline Stall Design?
- Exhibitors: Check whether products, staff and visitors can fit comfortably before approving a direction.
- Exhibition agencies: Develop initial concepts and show clients alternative layouts.
- Fabricators: Clarify the intended appearance before discussing materials and construction.
- 3D designers: Explore arrangements and presentation directions alongside existing design tools.
- Freelancers: Test furniture or branding changes during client reviews.
- Marketing teams: Review messages, logo visibility and product emphasis before internal sign-off.
An online exhibition stall designer gives these teams a shared visual reference. Feedback becomes more actionable when everyone can point to the same counter, display or panel.
Frequently Asked Questions
1. What is an inline exhibition stall?
An inline exhibition stall is a booth with one primary open side facing an aisle. It usually has neighbouring stalls to its left, right and rear. Because access is concentrated at the front, the design needs a clear entrance, visible branding and enough internal space for products, staff and visitors.
2. How do you design an inline exhibition stall?
Confirm the dimensions and organiser’s requirements, then choose a one-side-open layout. Position your main product display and brand message before adding furniture. Check the arrangement with people, occupied seating and open cupboard doors in mind. Review the concept in 3D and prepare views for stakeholder approval.
3. Can I design an exhibition stall online?
Yes. Tools such as Boothlane support exhibition stall design online through a browser-based 3D workflow. You can develop a concept, customise furniture and branding, and create presentation outputs without installing heavy desktop software. Begin with accurate dimensions and a clear brief to make the process more useful.
4. What software can I use for exhibition stall design?
Boothlane by EaseMyExpo is exhibition booth design software for creating and reviewing concepts in your browser. When choosing exhibition stall design software, match the tool to the task: layout exploration, detailed modelling, presentation and construction documentation have different requirements. Check which stages and outputs your team actually needs.
5. Can Boothlane create an inline exhibition stall?
Yes. Boothlane supports one-side-open configurations and fascia options suitable for inline stall concepts. You can customise furniture, logos, branded panels, lighting and signage, then review the arrangement in 3D. Start with your booked footprint and assess how the layout serves your products and expected visitor activities.
6. Can I create a 3D exhibition booth without 3ds Max?
Yes. Browser-based 3D booth design software such as Boothlane lets you develop and visualise an exhibition concept without using 3ds Max. This can help with early layout decisions and presentations. Professional designers may still use specialist desktop tools for detailed modelling and other stages of their workflow.
7. How long does it take to create an exhibition stall concept?
A simple first concept can take minutes when your dimensions, branding and requirements are ready and you begin with a suitable layout. Refinement takes longer when products, furniture or stakeholder preferences need adjustment. Treat initial concept creation, presentation approval and construction planning as separate stages with different time requirements.
8. Can I show the stall design to my fabricator?
Yes. Share the concept views with your fabricator, the company responsible for physically building the approved stall. Include dimensions, product measurements, preferred finishes and the event manual. These details help the fabricator assess feasibility and costs rather than having to infer construction requirements from an attractive image alone.
9. Does Boothlane replace an exhibition stall designer or fabricator?
No. Boothlane helps teams create, edit, visualise and present concepts. Designers contribute spatial judgement, brand interpretation and detailed design expertise. Fabricators plan construction and installation. The tool supports their work by making early ideas easier to review and giving stakeholders a clearer basis for feedback.
10. What should an inline booth include?
An inline booth should include visible branding, an accessible entrance, a clear product or service display and suitable lighting. Add reception, seating and concealed storage according to your objectives and space. Prioritise what visitors need to do inside the booth, then remove objects that obstruct those activities.
See Your Inline Stall Before It’s Built
Good inline exhibition stall design gives visitors a reason to stop and room to engage. Reviewing the layout early helps you spot a hidden product, blocked entrance or oversized counter while changes are still straightforward.
Open Boothlane by EaseMyExpo with your booked dimensions and main product in mind. Create the first concept, review it with your team and take a clearer brief to your fabricator.